There is nothing quite like the sinking feeling of unboxing a beautiful new set of custom blinds, holding them up to the window, and realizing they are a half-inch too wide. It’s a frustrating—and often expensive—mistake. But it’s also entirely preventable.
When you decide to upgrade your home with custom window treatments, the success of the project hinges almost entirely on one crucial step: the measurements. Unlike off-the-shelf options that offer “close enough” sizing, custom shades are built to the exact specifications you provide. Precision matters.
This guide will walk you through everything you need to know to measure like a pro. Whether you are opting for a sleek inside mount or a fuller outside mount, we will ensure your numbers are spot-on so your installation goes smoothly.
Gather Your Tools Before You Start
You don’t need a toolbox full of equipment, but you do need the right equipment. Using the wrong measuring tool is the number one cause of mismeasured windows.
Here is what you need:
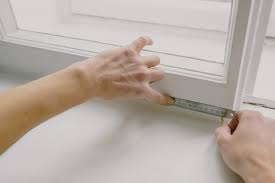
- Steel Tape Measure: This is non-negotiable. Cloth measuring tapes (like those used for sewing) can stretch, and wooden rulers aren’t long enough. A 25-foot steel tape with a wide blade is ideal because it stays straight over longer distances.
- Step Ladder: Safety first. Trying to measure while balancing on a chair usually leads to shaky hands and inaccurate numbers.
- Pencil and Paper: Don’t rely on your memory. Write down every measurement immediately. It helps to draw a rough sketch of your window to label the width and height clearly.
- Level (Optional but recommended): This helps check if your window frame is square, which is important for older homes.
The Big Decision: Inside Mount vs. Outside Mount
Before you extend your tape measure, you must decide how you want your blinds to hang. This choice dramatically changes how you measure.
Inside Mount
This is the most common style. The blinds sit inside the window recess, flush with the wall. It offers a clean, minimalist look and allows you to showcase decorative molding around the window.
Choose Inside Mount if:
- You have deep window frames.
- You want a modern, built-in appearance.
- You plan to layer curtains or drapes over the blinds.
Outside Mount
The blinds attach to the wall above the window or directly on the trim. This style covers the entire window opening and frame.
Choose Outside Mount if:
- Your window frame is too shallow for mounting brackets.
- You want to block more light (great for bedrooms).
- You want to hide unattractive window molding.
- You want to make the window appear larger than it actually is.
How to Measure for an Inside Mount
Precision is critical here. The factory will usually take a tiny deduction (typically 1/8 to 1/4 inch) from your measurements to ensure the blinds don’t scrape the sides of the frame. Your job is to give them the exact opening size. Do not make your own deductions.
Step 1: Measure the Width
Measure the width inside the window casing at three points:
- Top: Measure across the top near the head jamb.
- Middle: Measure across the center.
- Bottom: Measure across the bottom near the sill.
Crucial Tip: Circle the narrowest of the three measurements. This is the number you will use for the width. If you use the widest measurement, the blind might get stuck in the narrower parts of the frame. Record to the nearest 1/8th of an inch.
Step 2: Measure the Height
Measure the height inside the window casing at three points:
- Left: From the top inside edge to the sill.
- Center: From the top inside edge to the sill.
- Right: From the top inside edge to the sill.
Crucial Tip: Circle the longest of the three measurements. This ensures the blind covers the full length of the opening.
Step 3: Check Your Depth
Verify that your window recess is deep enough to hold the mounting brackets. Most manufacturers list a “minimum depth requirement.” If your frame is too shallow, the headrail will stick out into the room, which might look awkward.
Step 4: Check for Squareness
Measure the two diagonals (top-left to bottom-right, and top-right to bottom-left). If the numbers are significantly different (more than 1/2 inch), your window is not square. An inside mount might result in gaps or crooked blinds. In this case, consider an outside mount to hide the imperfections.
How to Measure for an Outside Mount
Since there is no frame to restrict you, measuring for an outside mount gives you more flexibility. You are essentially deciding how much area you want to cover. There are no factory deductions for outside mounts; the product will be made to the exact size you specify.
Step 1: Determine the Width
Measure the width of the area you want to cover.
- Standard approach: Measure the width of the window opening and add 3 to 4 inches total (1.5 to 2 inches on each side). This overlap ensures privacy and minimizes light gaps that can occur at the edges.
- Mounting on trim: If you are mounting directly onto the window trim, simply measure the width of the trim from outer edge to outer edge.
Step 2: Determine the Height
Measure the height of the area you want to cover.
- Top point: Determine where the headrail will go. This is usually on the flat surface of the trim or about 2 to 3 inches above the window frame on the wall.
- Bottom point: Determine where you want the blind to end. This is usually the bottom of the sill. If there is no sill, you might want to extend the measurement 2 to 3 inches below the window opening for better coverage.
Pro Tip: If you want to make your ceilings look higher or your windows look taller, mount the blinds closer to the ceiling rather than right above the window frame. Just make sure you order the blinds long enough to reach the bottom!
Common Mistakes to Avoid
Even seasoned DIYers can stumble when measuring. Watch out for these common pitfalls:
- Assuming All Windows Are the Same
You might have three identical-looking windows in your living room, but houses settle and shift. One window might be a half-inch narrower than its neighbor. Measure every single window individually. Do not assume “Window A” measurements apply to “Window B.” - Measuring the Old Blinds
Never measure your existing blinds to determine the size for new ones. Blinds can warp or shrink over time, and different manufacturers use different allowances. Always measure the window opening itself. - Ignoring Obstructions
Look closely at your window frame. Are there window cranks, alarm sensors, or handles that stick out? These can interfere with the operation of your new shades. If you have protruding hardware, you might need an outside mount or specific spacers. - Mixing Up Width and Height
This sounds basic, but it is the most frequent error in the industry. The industry standard is always Width first, then Height (W x H). If you flip these numbers, you will end up with a very strange-looking window treatment that won’t fit. - Reading the Tape Measure Wrong
Take your time reading the hash marks. It is easy to confuse 3/8 with 5/8 if you are rushing. If a measurement falls on a 1/16th mark, round down to the nearest 1/8th for width (on inside mounts) to be safe, but consistency is key.
Special Scenarios: Bay Windows and Corner Windows
Measuring standard rectangular windows is straightforward, but what about tricky corners?
Bay Windows
Bay windows typically consist of three windows set at angles. The challenge here is ensuring the headrails of the blinds don’t collide in the corners.
- You will need to use cardboard templates or calculate the depth of the headrail to determine where the blinds will meet.
- Generally, you measure the back width of the center window and subtract the depth of the side blinds.
- This can be complex. If you are unsure, this is a great time to call customer support for the blind company you are purchasing from.
Corner Windows
Similar to bay windows, two windows meeting in a corner require careful planning. Usually, one blind (the “butt” blind) will run all the way into the corner, and the second blind (the “pass” blind) will butt up against the first one. You must account for the depth of the headrail so the second blind has room to hang properly.
Double-Check, Then Order
Once you have all your numbers written down, take a break. Grab a coffee. Then, go back and measure everything one more time. It takes ten minutes to double-check, but it can take weeks to wait for a replacement blind.
Comparing your two sets of measurements is the best insurance policy against errors. If you find a discrepancy, measure a third time to break the tie.
Final Thoughts
Measuring for custom blinds and shades is a satisfying DIY project that saves you money and results in a tailored, high-end look for your home. By using the right tools, understanding the difference between mount types, and following the “measure twice, cut once” philosophy, you can order with confidence.
Remember, if your windows are particularly unusual, extremely large, or difficult to reach, don’t hesitate to consult a professional. Many window treatment companies offer virtual consultations or measurement checks to help you get it right.
Now, grab that steel tape measure and give your windows the custom look they deserve.